Throughout this guide I will use several visual indicators to communicate the intention of certain aspects of the procedure. The system is as follows:
- Text in Italics and this color signifies amplifying information or the intention of a step to enhance your understanding. Please give these a read if you're at all unsure of what you're accomplishing in a certain part of the procedure. Not all steps will have this, just ones that I though might need it.
- Text in Bold signifies a critical part of a step or a warning where if you fail to follow the guidance here, you can damage the printer or hurt yourself. I may also issue stopping points based on conditions that may or may not be present, these situations are to address situations outside the scope of this procedure. Pay particular attention to these.
- I will be using the official CAD model for increased visual clarity during this guide. If a picture of the physical mechanisms is important to understanding or clarity, I will provide those in addition as necessary. If a step doesn't have a picture, I thought it doesn't need one, but I'm open to feedback on the discord about editing this post.
- This guide assumes a basic knowledge of the tools included in your M5 toolkit and some basic technical terminology regarding the parts of the printer. I will explain in further detail in parenthesis when I deem it appropriate for those of you who aren't so familiar.
¶ What You'll Need
- M5 Toolkit
- Replacement V-wheels
- A well lit, spacious, and clean worksite (can't stress the importance of this enough)
¶ Initial Conditions and Assumptions
- The printer is fully assembled per these instructions and has not been damaged in the process of assembly or shipping.
- The printer is powered off with the power cable plugged into both a suitable wall outlet and the back of the machine.
- The build plate is at room temperature (around 21° Celsius or 72° Fahrenheit as read on the touch screen)
- The V-Wheels under the bed have some defect and need replacement or tightening of the bed bracket fasteners to eliminate play/slop in the fastening mechanism.
¶ Procedure
1. Power on your machine via the power switch on the back of the machine and let the “Running diagnostics.” text disappears on the touch screen. If errors are present on the touch screen, stop and resolve those errors before resuming this procedure. Providing power to the stepper motor drivers and moving parts by the interface will minimize the current that is backfed into the stepper drivers during the subsequent steps of this procedure, prolonging their lifespan.
2. Using the touch screen on your printer or the phone app, move the gantry (the bar the print head is attached to) to it's highest Z position in 10mm increments. This will keep the gantry out of the way for the remainder of the procedure and make the rest of this process go more smoothly.
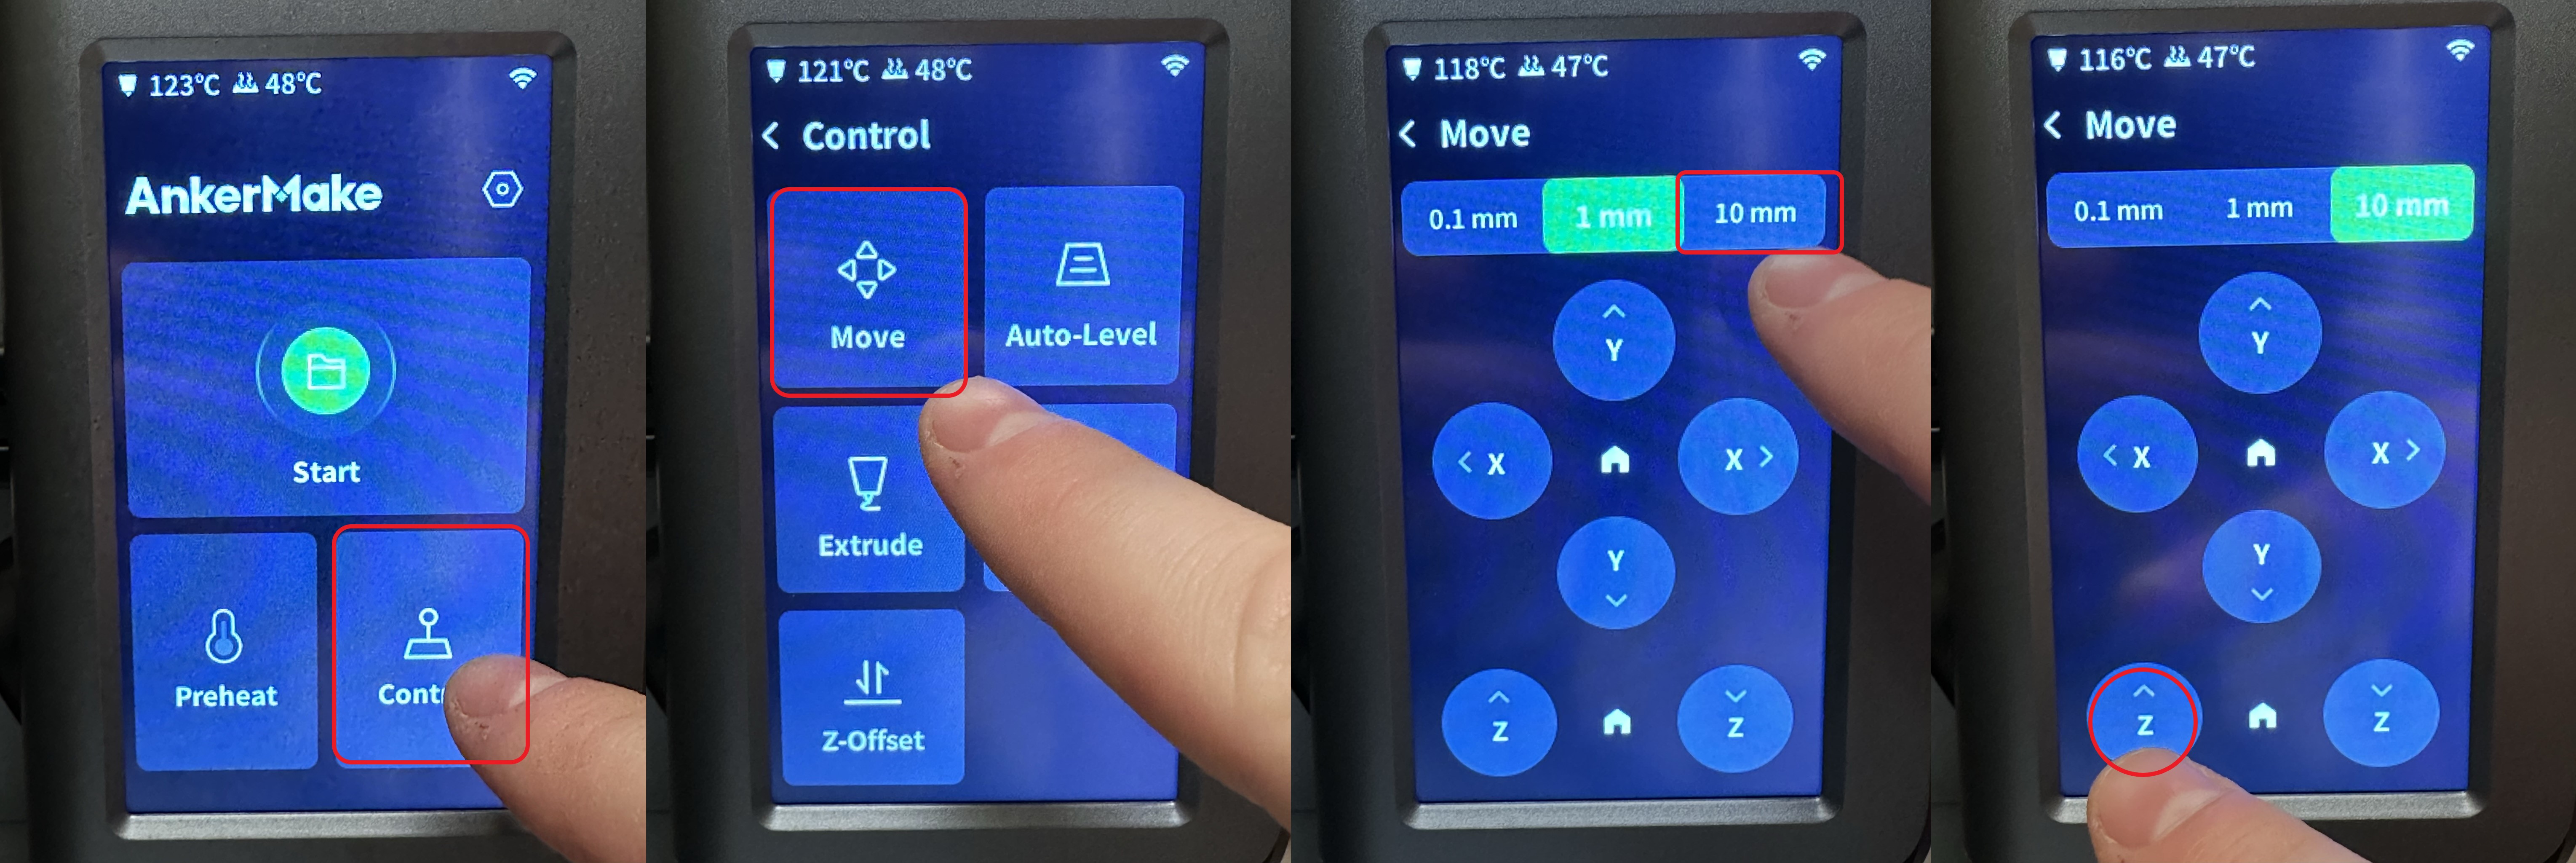
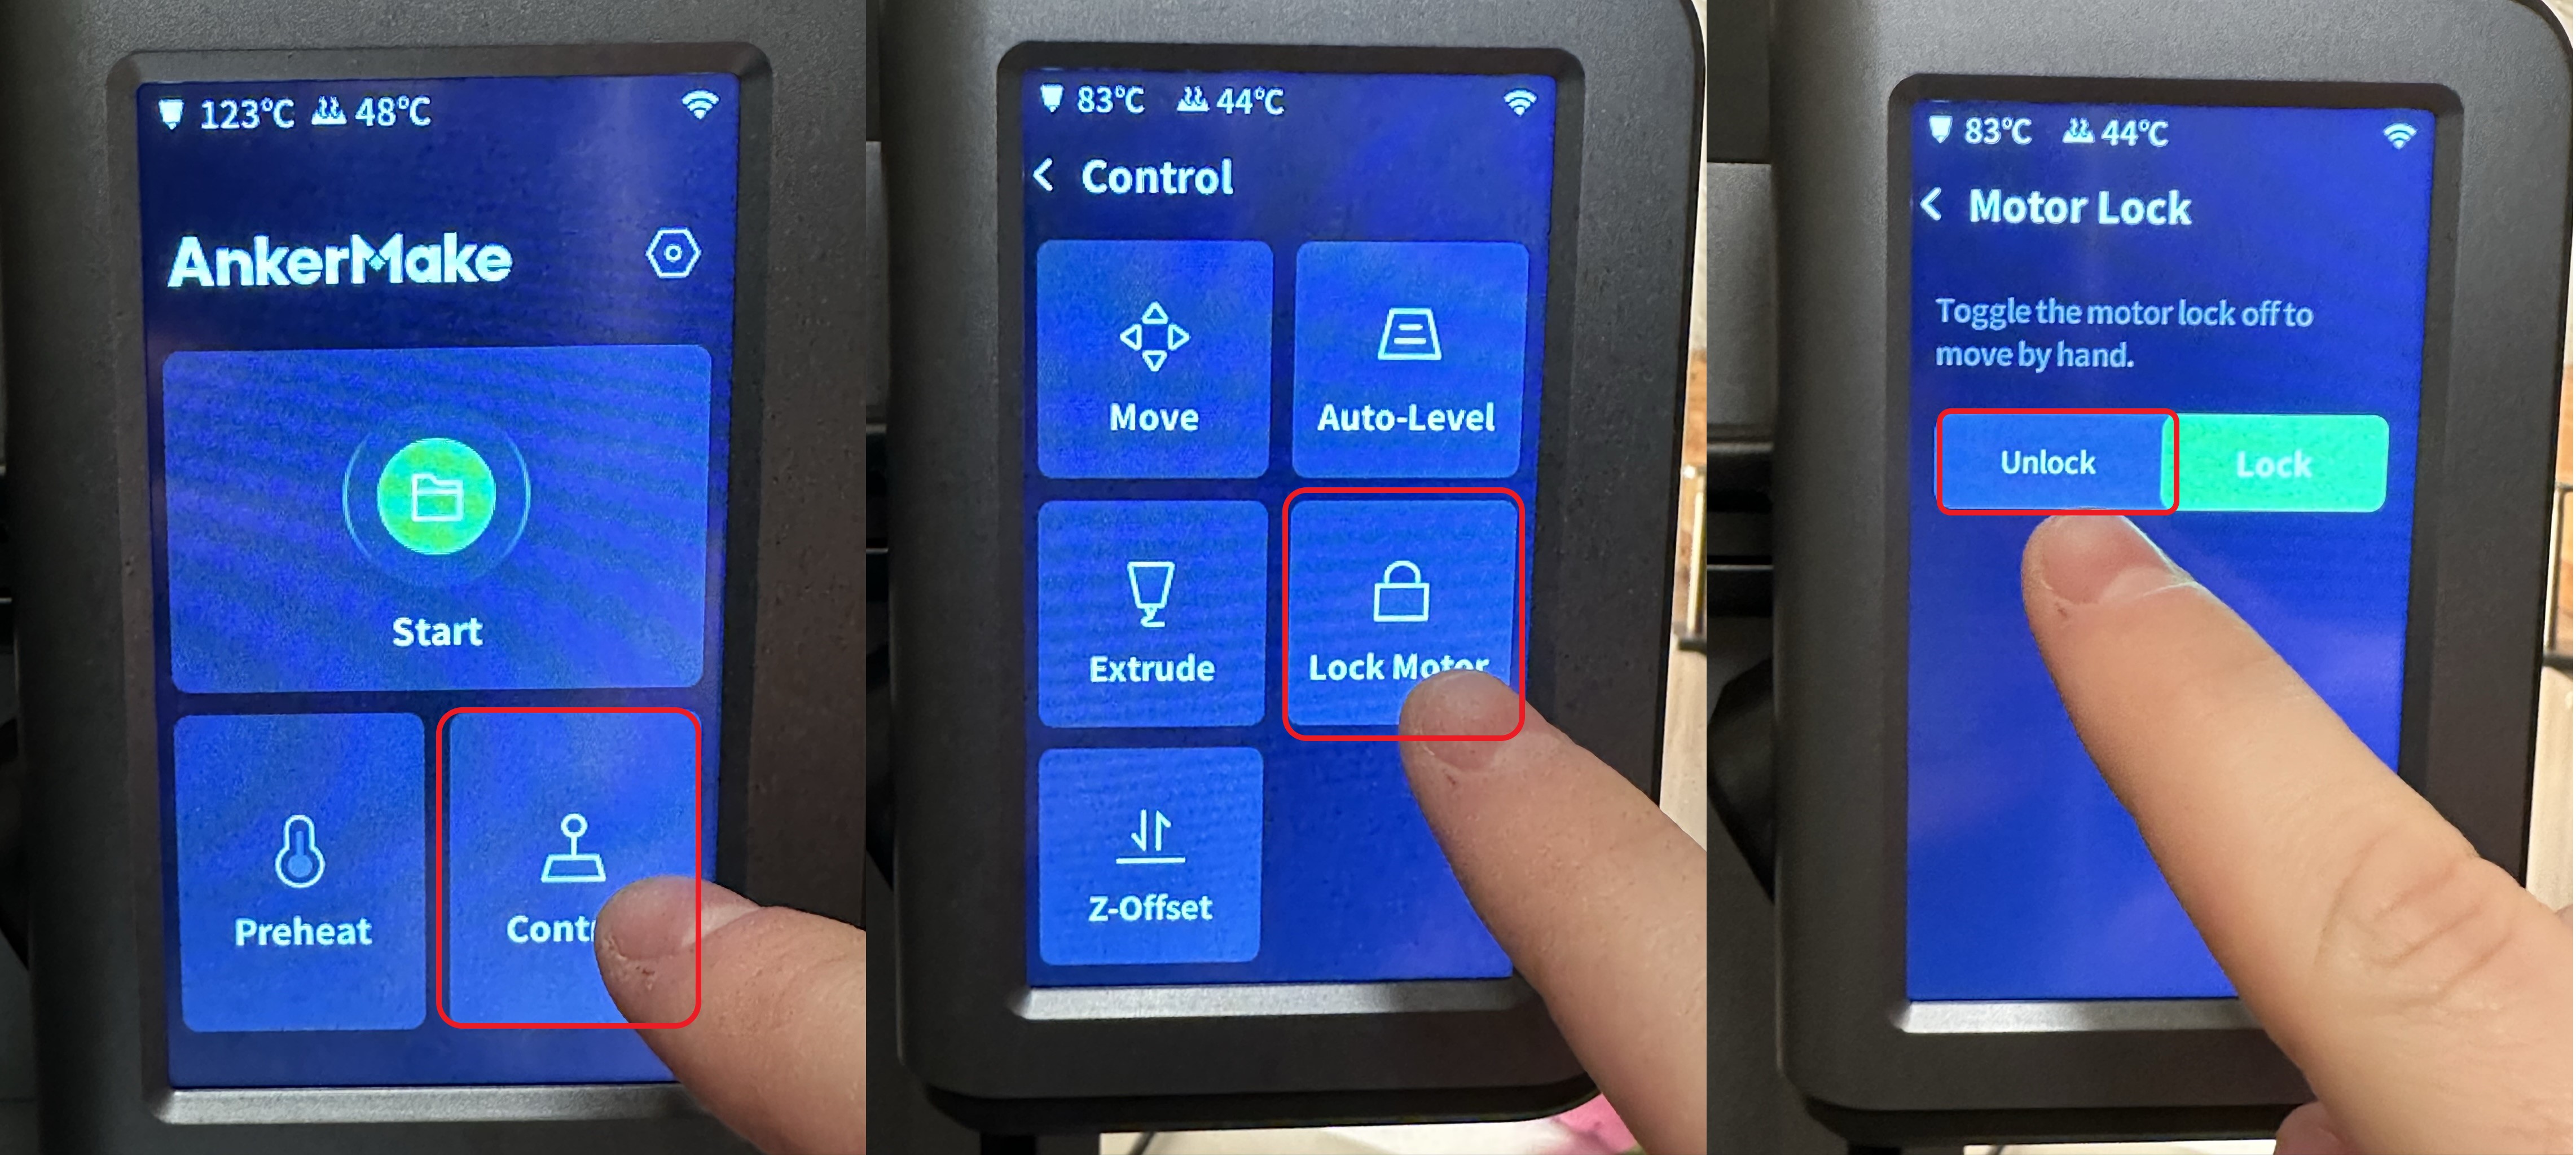
3. Using the touch screen on your printer, unlock the motors. Stops the current running from the stepper drivers to the motors so we can move them by hand without causing current spikes in the motors by skipping steps.
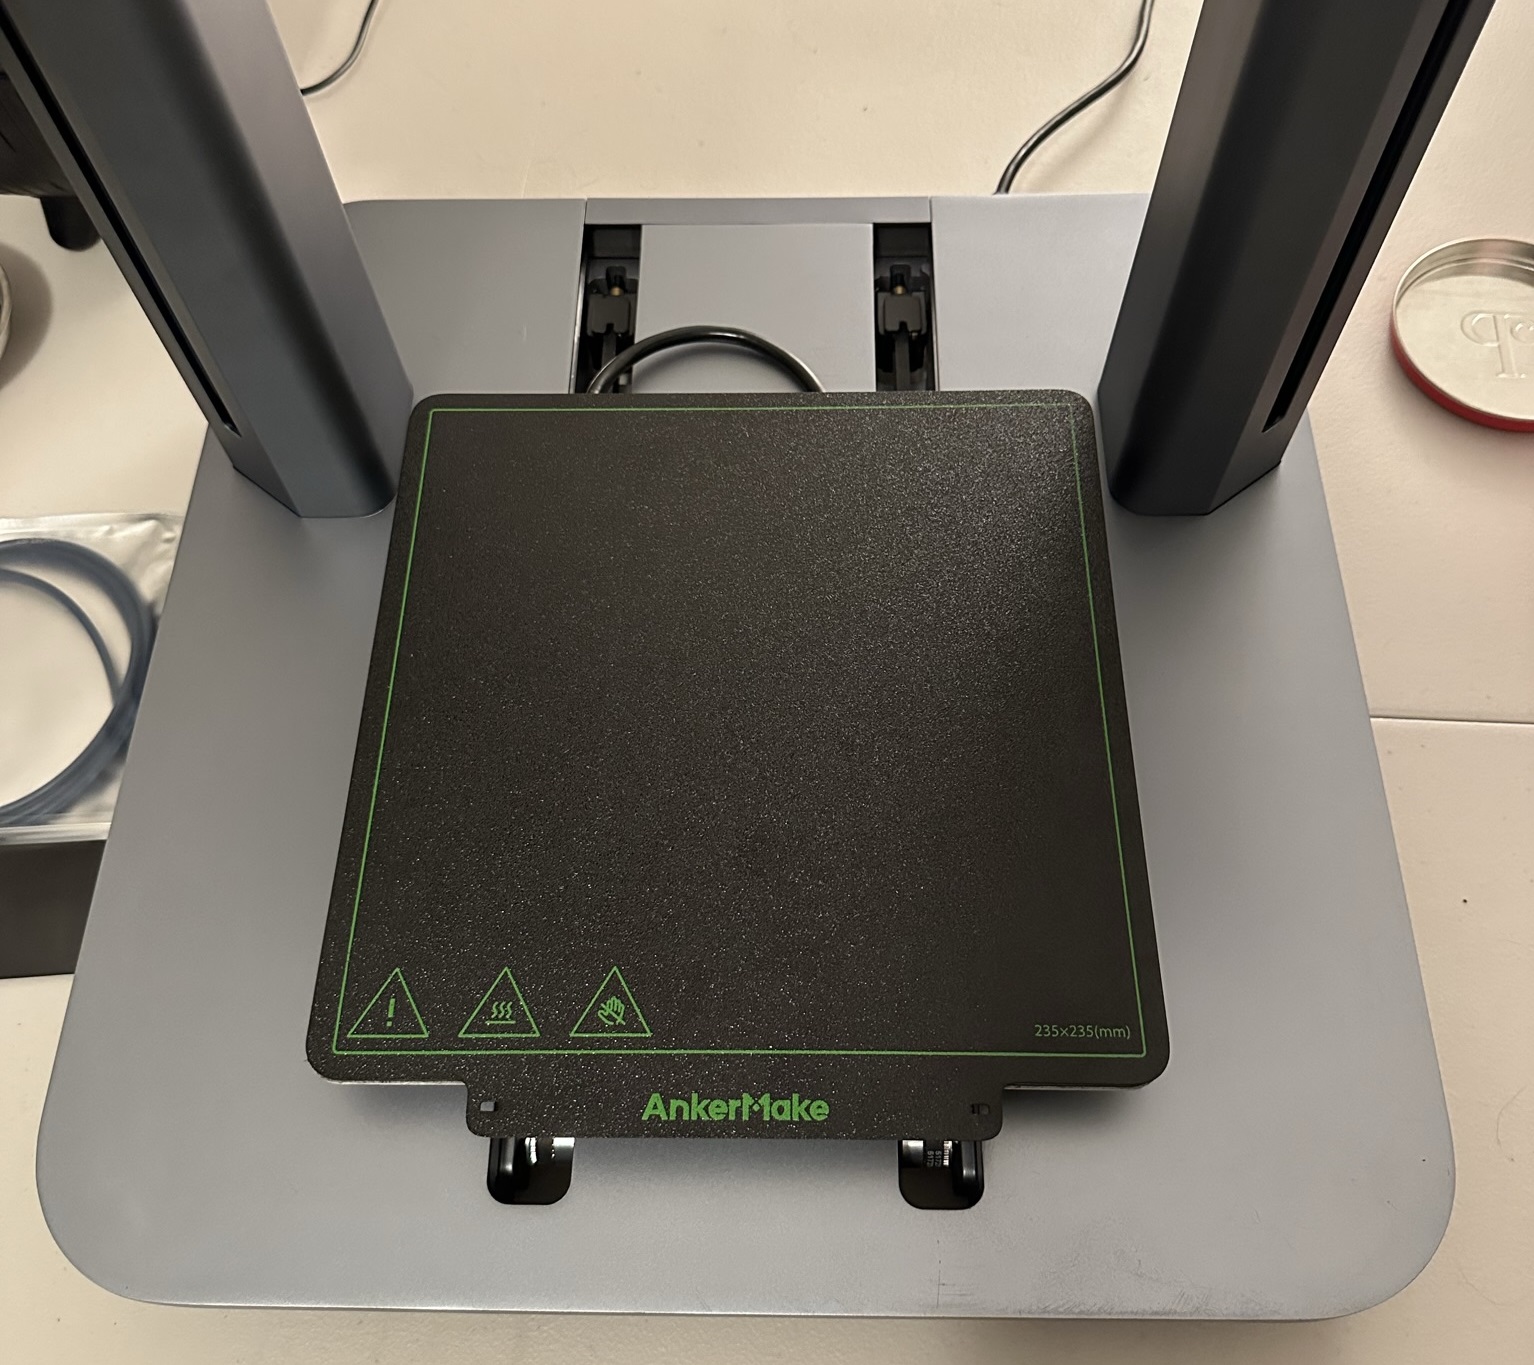
4. Lightly drag the bed with your hands all the way towards the front of the frame until it stops. Push the bed back slightly until you can see the motor pulleys clearly from directly above and then stop. Gives ample access to the Y-Axis belts and and front toothed pulleys for belt removal.
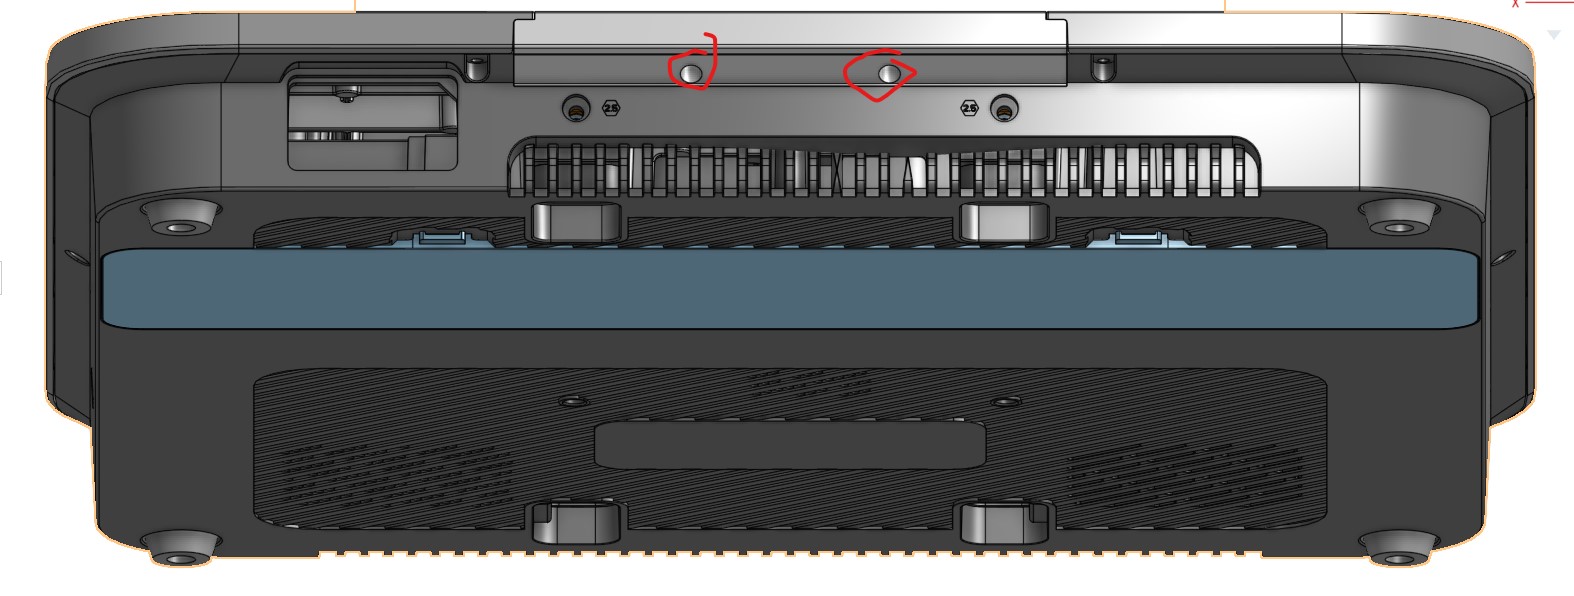
5. Power off the printer and disconnect the power plug from the back. Rotate the printer 180° so that the back faces you as pictured.

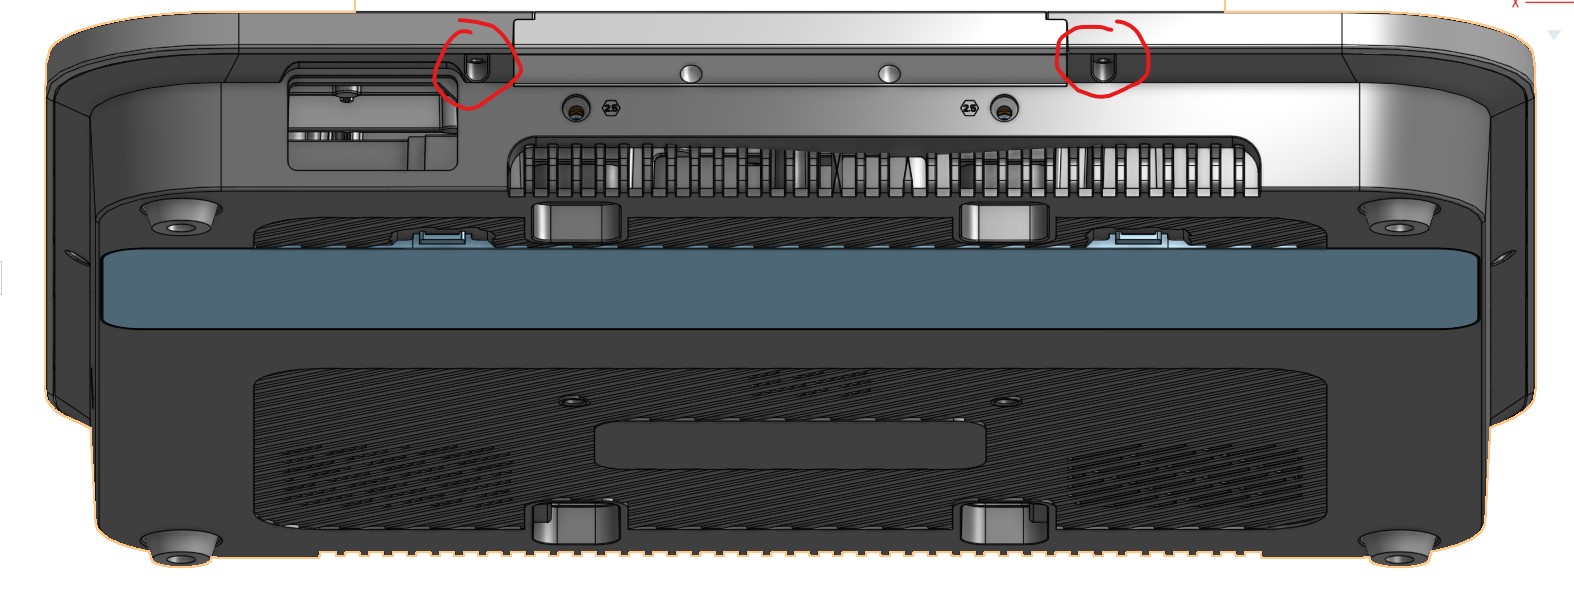
6. Fully remove the belt tensioning screws from the machine using a 2.5mm hex bit. The belt tensioners should now hang loose in their grooves and the belt should be completely slack. DO NOT move the bed from this point on until you have fully removed the belts later in this guide. Failure to follow this could result in kinked or severed belts.

7. Using a 2mm hex bit, remove the screws holding the bottom plastic hosing to the frame nearest to the screws in the previous step.
8. Using a 2mm hex bit, remove the screws holding the bed retention piece in place then pull off the bed retention piece .
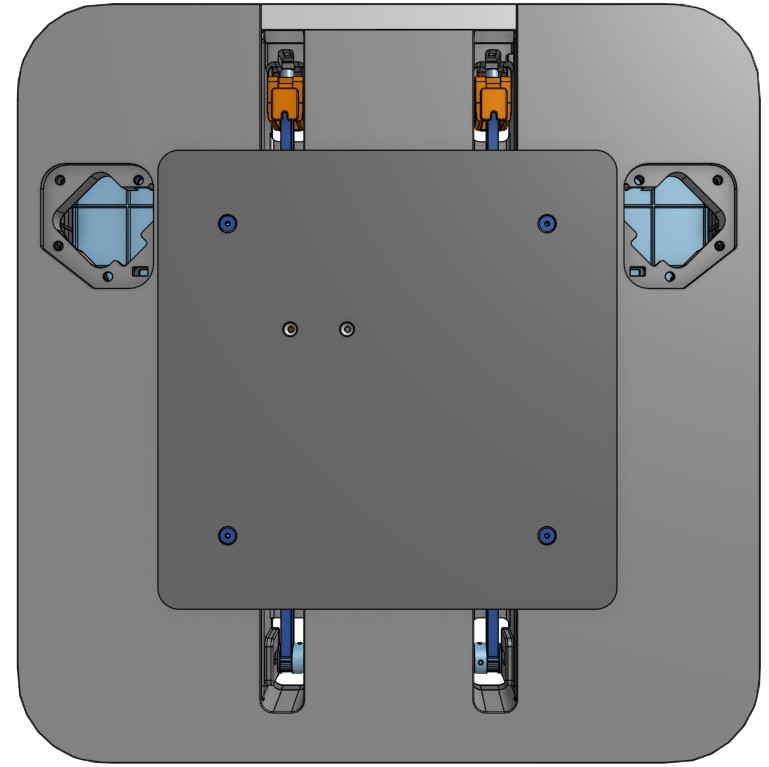
9. Remove the PEI print plate to expose the bed retaining screws. Remove bed retaining screws (blue screws in the picture) using a 2.5mm hex bit.
10. Find a place to put the now detached bed where it's out of the way, but also won't strain the non-removable wiring.
11. Remove the rubber O-Ring (Looks like a black rubber band) from the bed bracket. Pay attention to where this goes for re-installation.
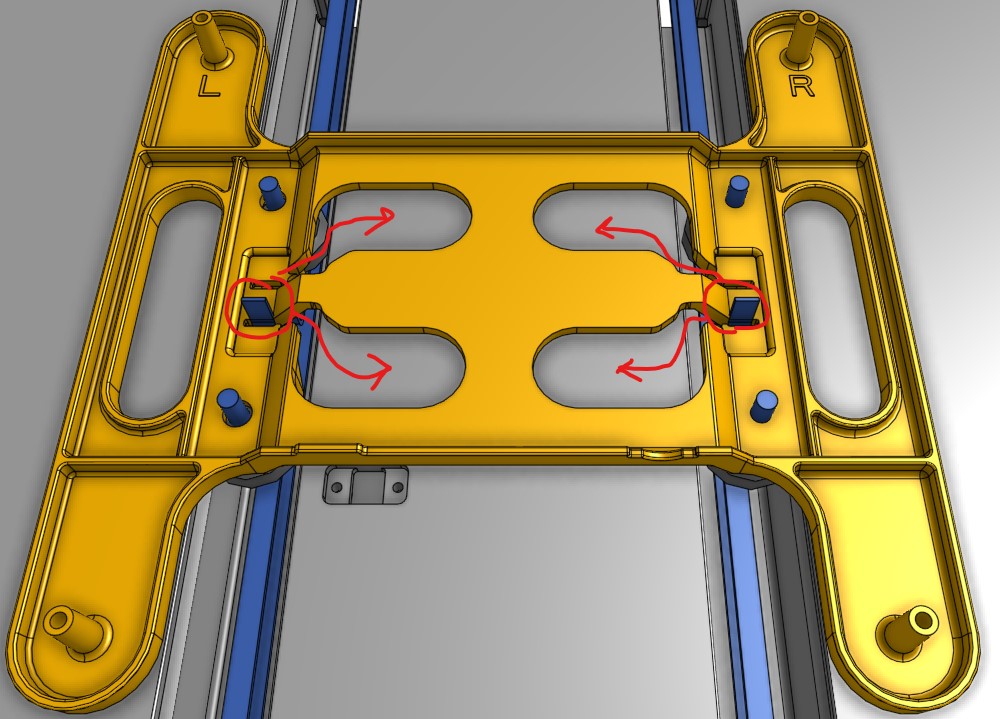
12. Remove the belts from the bracket by pulling up on their brass retaining tabs and sliding them out via the cutouts on the bed bracket. There are four tabs in total securing the two belts to the bed bracket, be sure to remove all four. Remove the belts from their channels taking care to not damage the belt teeth and keeping the belts routed through the tension idler pulleys.
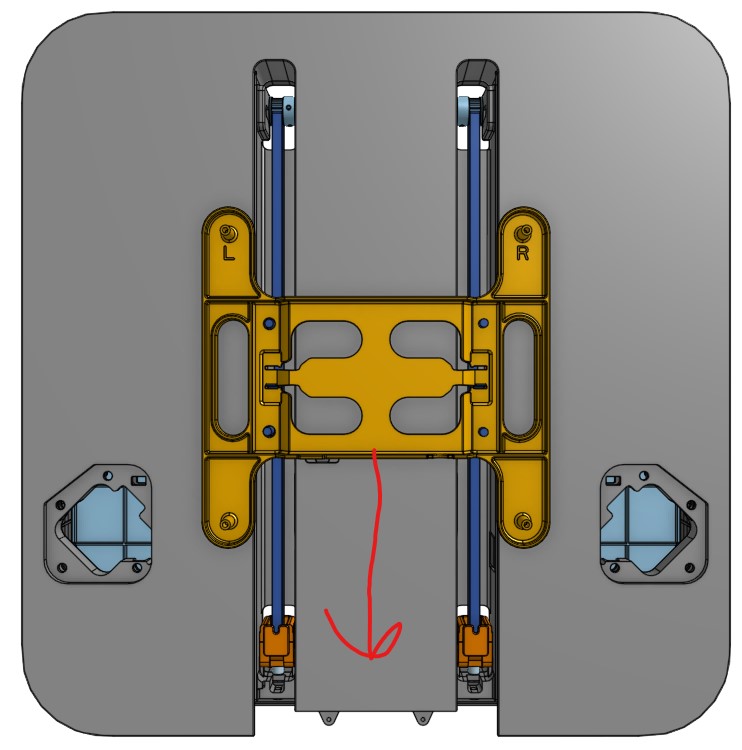
13. Slide the bed bracket out of the back of the base. The bed wire will interfere with removal unless the bed is lower than the bed bracket.
14. Replace the defective V-wheels or tighten the attachments as necessary.
15. Place the bed bracket back into the tracks on the base. Refer to step 13 for the proper orientation of the bracket.
16. Adjust the eccentric nuts (10mm wrench) on the left side of the bed so that the wheels are tight against the track. The wheels should be tight enough not to wobble but loose enough to allow you to spin the wheel without moving the bed (with considerable resistance, you should have to hold onto the bed to keep it stationary). Give it a few runs back and forth, it should run completely smooth and without wobble or creaks. Lightly push down on all 4 corners and check that there is minimal movement, It should be very stiff. If you find any defects, pull the bed out and adjust.
17. Re-run the belts into the channels, around the toothed pulleys, and back into the bed bracket. The should run under the wheels and up into the bed bracket like the picture below.

18. Insert the belt tension idler pulleys into their brackets and re-install the tension screws in the tension idler pulleys that were removed in step 6. Leave the belts relatively loose.
19. Repeat steps 1 and 3 of this guide (skip step 2 or you'll likely damage your bed magnet when the machine tries to home the z axis), then follow this guide to tension the Y-axis belts. The final belt tension should be springy, but not drooping. You should be able to touch the toothed sections of each belt together, but there'll be some resistance; when in doubt, it should be slightly less tight than you would think. To synchronize the belt tensions across the two Y-Axis belts: tighten one to the correct tightness, download a guitar tuner app to your phone and pluck the belt lightly a few times. That should display a frequency on the tuner that you can use to match the tension on the other belt. Take your time, get this right. DO NOT re-install the grub screws into Y-axis motor gear until you have achieved the final belt tensions. The screws are removed to allow tension to be felt evenly throughout the belt's length. Without the grub screws, the motor gears can slip around on the axle to distribute the tension force evenly.
20. Give the bed a few runs back and forth. It should feel smooth and consistent throughout the entire travel. If it feels different than it did in step 16, re-tension your belts in accordance with step 19 from scratch. Pay particular attention to synchronizing the belt tension.
21. Re-install the plastic piece and screws removed in step 8.
22. Re-install the screws removed in step 7.
23. Re-install the O-ring removed in step 11.
24. Place the bed back onto the bracket and re-install the bed screws. Tighten in a cross pattern. It doesn't need a lot of torque, you'll strip out the heads if you aren't careful.
25. Place the PEI coated build plate on top of the bed.
26. With no filament loaded into the machine and the nozzle sparkly clean, run ABL via the touch screen. Once this is complete, you should be able to set your Z-Offset with a first layer calibration and you're good to go! Congratulations, you did it!