¶ Cold Pulls
Preface
So what even is a cold pull and when should you do it? It's likely someone linked this article to you as part of a troubleshooting effort, I'll explain the theory here so you can add this usefull tool to your troubleshooting arsenal!
A cold pull (sometimes referred to as an atomic pull) is trying to accomplish one thing: to pull all the filament out of the hotend without leaving any behind in the nozzle. It's call a "cold pull" because it's generally done around the glass transition temperature (GTT) of the particular filament you're trying to extract, which is much lower than the printing temperature of said filament. The GTT is good starting point (not all printer's temps are the same due to differences in thermistor type and location) for the pull temperature since that's the temp at which the plastic starts to soften up, but isn't completely melted yet and that's perfect for what we're trying to do here.
The main use of cold pull is to extract little contaminants that settle inside the filament path (extruder gears to nozzle tip) and clog up the flow path. A clogged, or even partially clogged, flow path results in under-extrusion (less plastic exits the nozzle tip than is asked for by the slicer) and that's undesirable for a multitude of reasons and it's tricky to diagnose the source of the print problems it causes. We can “fish out” these little particles by pushing plastic through the hotend until there are no voids and then letting that slug of plastic solidify inside. With any luck, those particles will adhere to and be trapped by the plastic and we can pull them back out of the extruder in one, whole piece with the plastic slug. You'll be left with a negative image of the inside of the nozzle at the end of your filament strand and you may even be able to see the contaminants as well depending on the color and size of the particles.
As you can see from the image above, this technique is most effective when done several times back-to-back.
You may be asking yourself: “Sure, that's cool and all, but when would I know I need to do this?” and that's a great question, Hypothetical Reader. When you start to experience any symptom of inconsistent extrusion (but particularly under-extrusion), this is always what I recommend first. It's relatively fast and easy and solves the problem a good 60% of the time.
¶ How to do a Cold Pull
Read each step in it's entirety before attempting it. That will stop you from running into silly problems during this.
¶ What You'll Need
- Pliers
- M5 printer tool kit
- Filament that prints at the same or higher temp than the filament currently in the nozzle (preferably the exact same spool, but it's not that important). Most of the time, I just use the one that's already in the printer, but if you're in between rolls, you'll need enough filament exposed out of the top of the extruder to get a firm grip on with pliers.
¶ Initial Conditions and Assumptions
- [Required Condition] The printer is powered on and no errors are present on the screen.
- [Required Condition] The build plate is clear of all plastic and foreign objects.
- [Assumption] The hot end is cooled down to room temperature.
- [Assumption] The cold pull filament is PLA or PLA+.
¶ Procedure
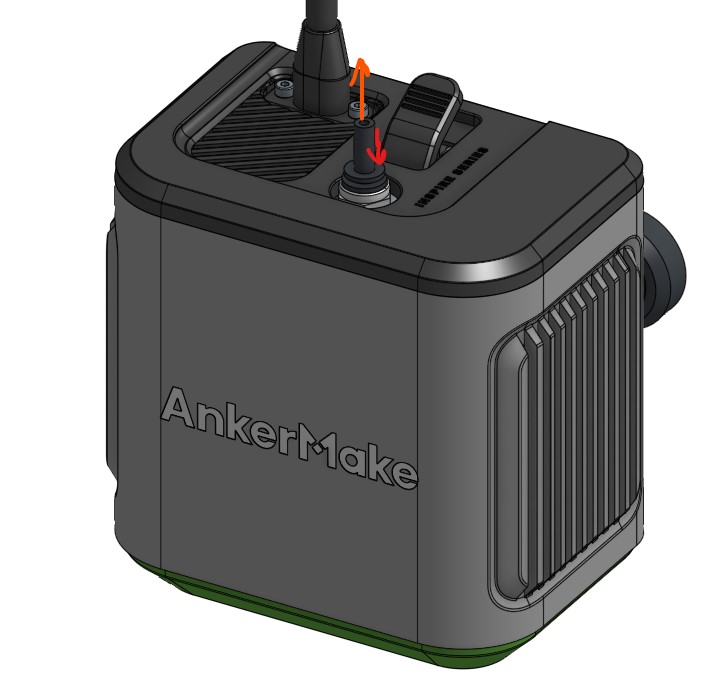
1. Remove the Boden tube from the top of the print head by depressing the black plastic ring and pulling up on the tube. Tuck the loose tube out of the way. If you have filament loaded, push the tube back so that at least 100mm of filament is showing.
2. Using the touch screen on the printer or the controls in the phone app, home the Z-Axis (up and down).
3. Using the touch screen on the printer or the controls in the phone app, raise the gantry 100-150mm above the build plate. (seriously, bring it up to that range, don't short it. It'll make one of the future steps easier)
4. Using a M2.5 hex bit from the tool kit, completely unscrew and remove the extruder idler tension screw and put it somewhere where you won't loose it. Let the idler arm rest loos against the print head backplate. As you remove the screw, count how many rotations it takes to remove the screw and make a note of that for later. (you can skip this step, but your hand will get really tired from holding the idler lever against the spring force for a long period of time)

5. If you're going to cold pull filament that is loaded into the machine, proceed to the next step. Find the tip of the filament you'll use for this and cut the edge at a 45° angle with the flush cutters in the tool kit. Hang your filament up on the spool holder and make sure to constrain the edge so the spool doesn't unwind or tangle. A binder clip is great to pinch the end to the side of the spool if it doesn't have those edge holes to weave it through.
6. Using the touch screen on the printer or the controls in the phone app, preheat the nozzle to normal printing temperature. Set the bed temperature to 0° as we don't need that to heat up for this. Once up to temperature, you can cancel the pre-heat if you're print head is moving back and forth to do the next step. Don't take too long though, you want it hot.
7. Insert your filament straight down into the extruder and push on the filament until it starts to come out of the nozzle. If you have filament already loaded, this shouldn't take a lot of length, leave enough room for your pliers to grip the filament at the top. If you haven't already, cancel the preheat and allow the nozzle to start cooling down. While the nozzle cools off, keep pushing down gently on the filament to keep it flowing very slowly through the nozzle. You don't need to push hard or have a tone of material come out, just enough so that gravity and oozing doesn't cause a void to form in the nozzle. You'll get a feel for it.
8. Once the temp of the nozzle reaches around 100C, you can stop pressing on the filament and let the nozzle cool to room temperature (seriously, let it cool all the way down or the pull will most certainly fail).
9. This is when you actually attempt the pull and it's more of an art than science. If your hot end moves back and forth when pre-heating, you'll have to cancel the pre-heat and immediately pull. set the pre-heat menu for the nozzle to around 75° then grab your pliers and gently grip a section of exposed filament above the extruder. Once you see 75 on the screen, pull firmly upward on the filament with constant, smoothly applied pressure and it should pop out. With any luck it will look like the inside of your nozzle, if it's blunt or looks mangled and stringy, the pull failed go back to step 5 and try again. If you are confused on what it should look like, see the picture in the preface for comparison, the one on the far left is ideal.
10. Repeat steps 5-9 as many times as needed to clear any contaminants. If you're simply doing this to remove the filament from the nozzle or swap filaments, you can just do it the one time.